•  Home
  •  Dashboard
  •  Company
    • About Us
    • Blog
    • Careers
    • Contact Us
    • Data Centers
    • Looking Glass
    • Network
    • Reseller
  •  Hosting Services
    • Backup
    • Content Delivery Network
    • Colocation Hosting
    • Dedicated Hosting
    • DDoS Mitigation
    • IP Transit
    • Private Cloud
    • Wavelength
  •  Solutions
    • Ecommerce
    • Finance
    • Gaming
    • Hosting
    • Management
    • Security
    • System Integrator
  •  Support
    • Community
    • Knowledge Base
    • Open A Ticket
  •  USA & Canada: 800-933-1517
  •  International: 626-549-2801
  •  Email: sales@psychz.net
  • Services
    • Dedicated Servers
    • Colocation
    • Private Cloud
    • DDos Protection
    • IP Transit
    • CDN
    • Backup
  • Solutions
    • Ecommerce
    • Security
    • Gaming
    • Hosting
    • Management
    • Finance
    • System Integrator
  • Dashboard

Manage Your Contact

Trusted By
25,000+ Customers (Since 2001)
  • Home
  • Client
  • Knowledgebase
  • Client Area
  • Manage Your Contact

Table Of Content

Related Articles

  • Disable force password change feature
  • How to Reset Dashboard Password
  • Enabling Multi-Factor Authentication
  • How to temporarily/permanently enable DDoS IP diversion for a Single IP Address?
  • OS Install Overview
  • Operating System Installation through client area
  • How to setup API Access
  • How to create firewall (Edgelayer) rules?
  • How to access your mails?
  • How to create a new ticket?
  • Add a payment method to your existing account
  • How to Update Account Details?
  • Steps to change account password
  • How to mount ISO via IPMI Management Web Interface
  • How To Log Into Client Area?
  • How to access your dedicated server IPMI?
  • How to obtain login information of your dedicated server in client area?
  • How To Check Your Account Credits?
  • Views: (6534)
  • Votes: (0)
Was this article helpful?
VOTE

Manage Your Contact

Publisher: Psychz Networks,  September 18,2017

This article will help you in managing your contacts and grant permissions to them. Please click on the following link to view all your contacts https://www.psychz.net/dashboard/client/web/contacts/index

This field contains following fields.

# Title- This field displays different groups that can be assigned to the users so that the users related to similar tasks can become part of the same group.

# Name - This field displays the name of the users.

# Phone - Contact information of the user

# Email - Email id of the user.

# Action - The Action field contains the following functions.

1. Edit - Click on the "Edit" button to alter the information of the contacts.

2. Deactivate - Click on the "Deactivate" button to disable the user.

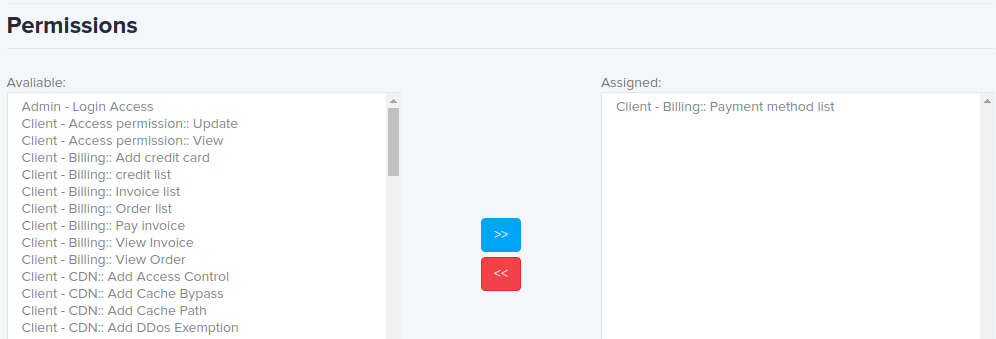
3. Permission - Click on the "Permission" button to assign permission to the users. When you click on the Permission button, a page will open displaying two visible boxes, one containing all the available permissions and other box containing assigned permissions. Use the arrow keys to move the permissions from one box to another.


Create Contact

The "Create Contacts" button is used to create a new contact. Please fill in the basic information of the contacts (Name, Title, Phone, Language etc.). You can also create the contact's user id and password.

Hosting Services
  • Dedicated Hosting
  • Colocation Hosting
  • Backup
  • IP Transit
  • DDoS Mitigation
Support
  • Portal Login
  • Knowledgebase
  • Community
Company
  • About Us
  • Contact Us
  • Network
  • Data Centers
  • Looking Glass
  • Affiliates
  • Reseller
  • Blog
Policies
  • Privacy Policy
  • Acceptable Usage Policy
  • Terms and Conditions
  • Service Level Agreement
Company
  • Psychz Networks,
    A Profuse Solutions Company
    611 Wilshire Blvd #300
    Los Angeles,California 90017
    USA
  • US/Canada: 800-933-1517
  • International: 626-549-2801
Subscribe to Our Mailing List
* indicates required
Copyright © 2022 Psychz Networks, A Profuse Solutions Inc Company