


S3 Browser is a freeware Windows client designed for managing S3-compatible object storage. This guide walks you through configuring the S3 Browser to connect to Psychz's sObject. It's crucial to have access to a Windows workstation and your sObject Storage credentials, which you'll obtain when you deploy sObject from your Psychz Dashboard.
Important Note: While creating the sObject, the system will display the following details
Access Key: DRTYHBVJGBGCHBNJ
Secret Access Key: UTGjuhtfgyTHJGHhuuhgghhtYUIJHGfyghhbhjgfHGGH
Endpoint URL: https://sobject.uswest1.psychz.net
You must copy and save the data in a secure place, as you will need this information while creating the bucket. After 60 minutes, this information will disappear from the dashboard.
Download and Install S3 Browser
- Access the S3 Browser Website
- On your Windows workstation, open a web browser and navigate to s3browser.com.
- Download and install the Software
- Once on the homepage, locate and click the "Download S3 Browser" button.
- After the download is complete, open the installer file. Follow the on-screen instructions to install the S3 Browser on your workstation.
Launch S3 Browser
After installation, you can launch S3 Browser by finding it in your Start menu or by double-clicking its desktop icon.
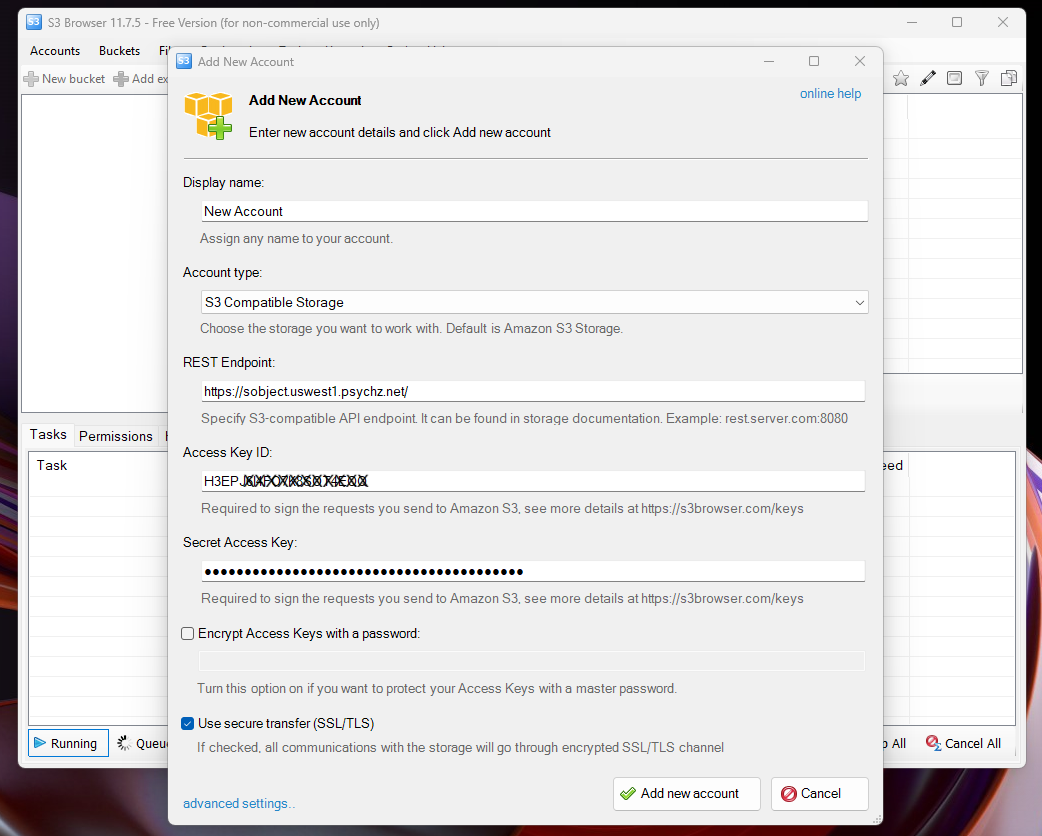
Add a New Account
- Navigate to Account Management:
- In the S3 Browser interface, locate the menu at the top. Click "Accounts" and select "Add New Account" from the dropdown menu.
- In the S3 Browser interface, locate the menu at the top. Click "Accounts" and select "Add New Account" from the dropdown menu.
- Enter Account Details:
- In the "Display Name" field, enter a descriptive name for your Psychz sObject account. This can be anything that helps you identify the account, such as "transaction_logs_sObject".
- Select Account Type:
- From the "Account Type" dropdown, choose "S3 Compatible Storage". This setting allows S3 Browser to connect to storage services that use the S3 API but are not hosted by AWS.
- Enter Endpoint and Port:
- In the "REST Endpoint" field, enter the URL provided by Psychz for sObject service.
- Enter Access Key ID and Secret Access Key:
- Enter your Access Key ID. This unique identifier for your account is shared with you when you create sObject.
- Enter your Secret Access Key. This acts as a password for your Access Key ID and is also shared with your Access Key ID at the time of sObject creation.
- Use Secure Transfer (SSL/TLS)
- Check the "Use Secure Transfer (SSL/TLS)" option to enable the encrypted SSL/TLS channel.
- Select Addressing Model
- Click on the "Advanced Settings" link at the bottom of the window and select "Virtual hosted style" from "Addressing Model" dropdown menu. Close when done.
Click the "Add new account" button to save your settings. S3 Browser will then attempt to connect to Psychz's sObject using the provided credentials.
Upload a File/Folder to Bucket
-
Select the Bucket
- In the left panel, you will see a list of buckets.
- Click on the bucket where you want to upload your file.
-
Upload a File
- In the toolbar, click Upload.
- Select Upload File (or Upload Folder if you want to upload an entire folder).
- In the dialog box that opens, browse your local machine for the file you wish to upload, select it, and click Open.
- Once the upload is complete, you should see the file listed in your selected bucket.
Set Bucket/File Permissions
- Right-click on the file or folder.
- From the list, select "Edit Permissions(ACL)" or press Ctrl+L
- From the available check boxes, select/enable Read from All Users row
- Select 'Apply Changes' to set the permissions
This file/folder can now be accessed using the following virtual bucket hostname: `<bucketname>.sobject.uswest1.psychz.net`.
You have now successfully configured S3 Browser to connect to Psychz's sObject. You can begin managing your object storage directly from the S3 Browser interface. With these steps, you can access, upload, and manage your data.