


Minecraft can be more exciting if you consider deploying it on a dedicated server. You will have much more freedom while playing and managing the resources. Dedicated servers are performance-driven, making them a highly efficient platform for gaming workloads. With a dedicated Minecraft server, you are the sole user of the server resources. Therefore, you can expect more processing, memory, and storage capabilities to handle demanding workloads better.
- Connecting to Linux Server
- Installing Java on Server
- Installing Minecraft
- Accepting EULA
- Running Minecraft Server
The main advantages of setting up a Minecraft server with dedicated resources include:
- Improved performance
- Full use of resources and bandwidth
- Control over mods and plugins
- Better security and privacy
The following article will teach you how to make a Minecraft server on a machine that runs on CentOS 8.
Connect to your Server
Ensure that you have root SSH access to your dedicated server machine. Open the SSH terminal on your local device and type the following command.
# ssh username@server_ip_addressNote: Use your username and your server IP address in the above command.
Type in your password and hit Enter. You should now be connected to your server.
Installing Java
Step 1: A Minecraft server requires Java. Therefore, you need to check if it is already installed on your system by executing this command:
# java -versionProceed to "Step 3: install Screen" if you already have Java installed. However, if Java is not found, follow the next step.
Step 2: Run the following commands to download and install the latest version of Java:
# sudo yum update# sudo yum install java -y
Step 3: Install Screen:
# sudo yum install screen -y
Installing Minecraft
We can begin installing a Minecraft server.
Step 1: We will create a folder named Minecraft to store all your configuration files. You can name it as per your choice. To do this, type:
# mkdir minecraftNote: This step is optional, but we highly recommend it so you can keep your system organized.
Step 2: Move to the newly-created directory.
# cd minecraft
Step 3: Before we can download the required configuration files, install wget:
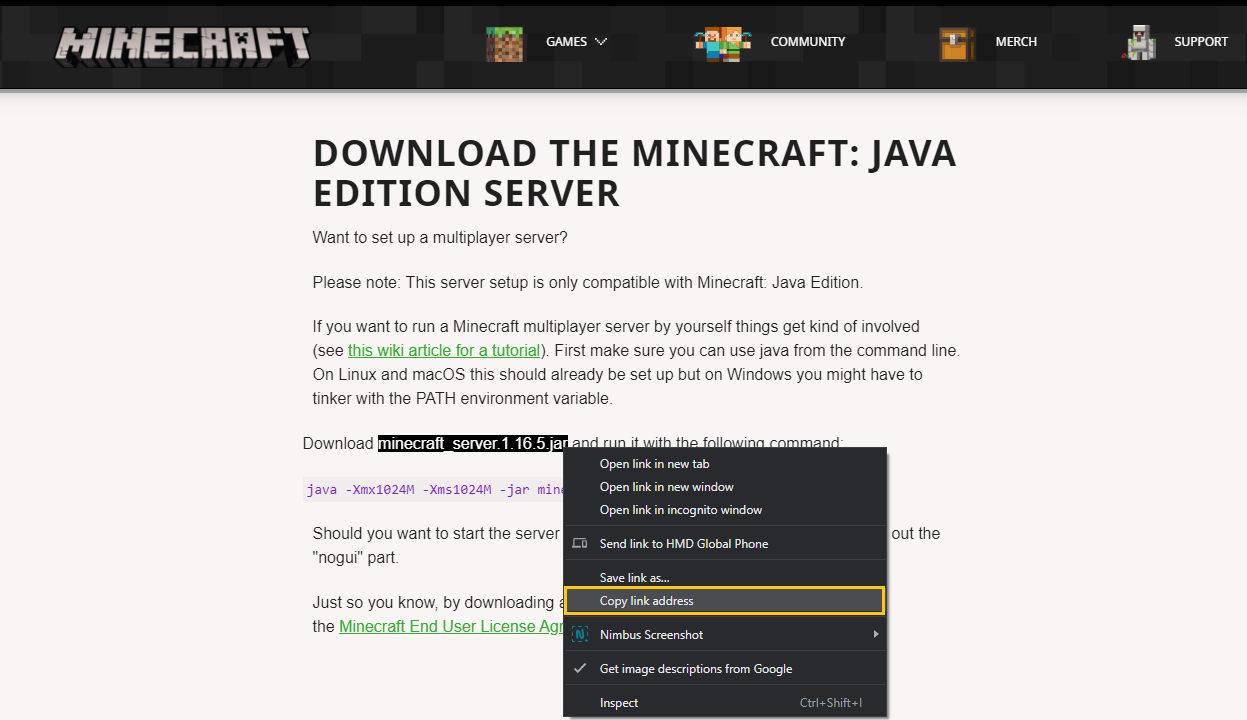
# sudo yum install wget -yStep 4: Go to the following Minecraft page https://www.minecraft.net/en-us/download/server and copy the download link of the latest version of Minecraft as shown below
Step 5: Use the wget command to download the Minecraft server file:
Step 6: Rename the server.jar file, so it matches the name of the Minecraft edition downloaded. At the time of writing, the latest Minecraft server release is 1.16.5. Therefore, we used the following command to rename the server.jar file into minecraft_server.1.16.5.jar:
# mv server.jar minecraft_server.1.16.5.jar
Step 7: Use the following command to start the server
# java -Xmx1024M -Xms1024M -jar minecraft_server.1.16.5.jar noguiNote: This will start the server without a graphical user interface. You can remove 'nogui' from the above command to start the server in graphical mode.
The output responds with an error informing you that you need to agree with the EULA (End User License Agreement) to run the service.
Output:
[00:44:11] [main/ERROR]: Failed to load properties from file: server.properties
[00:44:11] [main/WARN]: Failed to load eula.txt
[00:44:11] [main/INFO]: You need to agree to the EULA in order to run the server. Go to eula.txt for more info.
Accept Minecraft’s EULA (End User License Agreement)
Step 1: List the contents of the /Minecraft directory to verify you have the eula.txt file:
# ls
Step 2: To accept Minecraft’s EULA, open eula.txt file with Nano text editor:
# sudo nano eula.txtFind the line that says:
Then change it to:
To save the file Ctrl + q (^q) followed by Y for 'yes.'
Step 3: Once that is done, activate the screen so the server can run in the background:
# screen -S "Minecraft server"
Running Minecraft Server
Step 1: Try starting the Minecraft server again by rerunning the java command to executing the jar file:
# java -Xmx1024M -Xms1024M -jar minecraft_server.1.16.4.jar noguiWait for the system to finish executing. You should get a message that the process is Done!, meaning that the Minecraft server is up and running.
Step 2: You can now detach from the Minecraft screen by pressing Ctrl+a+d.
Note: To reattach to the screen, press Ctrl+r.