


Space Engineers is a creative sandbox game about engineering, construction, exploration, and survival in space and planets. Players can build space ships, space stations, planetary outposts of various sizes and uses (civil and military), pilot ships, and travel through space to explore planets and gather resources to survive.
IN the following article, we will show you how to setup Space Engineers game on your Windows 2019 (Sever Edition).
System Configuration(Recommended)
- Processor: CPU 4.5GHz, 2 cores
- Ram: 8 GB RAM
- Storage: 20GB Free space
Setting up Steam
First, create a folder for SteamCMD.
e.g.
Download SteamCMD from the following link
Unzip all the contents to "C:\steamcmd" folder
Install Space Engineers
We will now login to the steamcmd server. Double click on the steamcmd.exe. This should open a console with a command prompt.
Output
[ 0%] Checking for available updates...
[----] Verifying installation...
Steam Console Client (c) Valve Corporation
-- type 'quit' to exit --
Loading Steam API...OK.
Steam>
Now let us login to the steam account using anonymous. You can log in from your own account if you have one.
Steam>login anonymousOutput
Waiting for user info...OK
Steam>
Now, let us create a folder where we would like to install all game files and dependencies.
Note: You can name whatever you wish to the game folder where you would like to download all the files.
Now, let us download all Space Engineers game files. The App ID for this game on the Steam account is '298740'.
Steam>app_update 298740This should take about a few minutes to download all the files depending on your server's internet connection. The download size varies between 1.4 - 1.5 GB.
Output
Update state (0x61) downloading, progress: 95.89 (4515376918 / 4709026609)
Update state (0x61) downloading, progress: 95.93 (4517404438 / 4709026609)
Update state (0x61) downloading, progress: 96.34 (4536786262 / 4709026609)
Update state (0x61) downloading, progress: 96.74 (4555565949 / 4709026609)
Update state (0x61) downloading, progress: 97.06 (4570539251 / 4709026609)
Update state (0x61) downloading, progress: 97.35 (4584251656 / 4709026609)
Update state (0x61) downloading, progress: 97.58 (4595066978 / 4709026609)
Update state (0x61) downloading, progress: 97.77 (4604045285 / 4709026609)
Update state (0x61) downloading, progress: 97.99 (4614264705 / 4709026609)
Update state (0x61) downloading, progress: 98.16 (4622353861 / 4709026609)
Update state (0x61) downloading, progress: 98.31 (4629514611 / 4709026609)
Update state (0x61) downloading, progress: 100.00 (4709026609 / 4709026609)
Success! App' 298740' fully installed.
Run Space Engineers
We will now run the game server. Locate the SpaceEngineersDedicated.exe file under "DedicatedServer64" folder within the main folder where you have downloaded all the game files. In this case, the executable file is located under
Click on the file to run the game server.
Following are the details of options available.
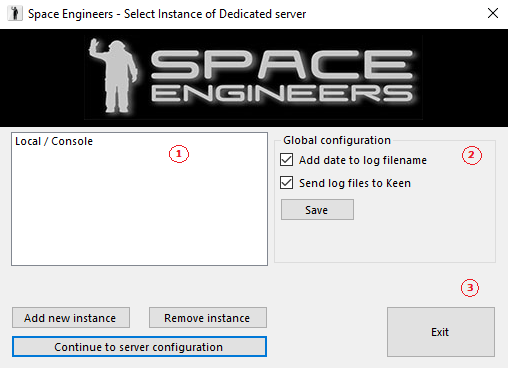
1. Server list
View all server instances. Since this is a fresh install of the game, you can see an instance named "Local/Console." This "Local/Console" instance is run in the foreground as a standard application. Other instances created by users are run in the background.
2. Global configuration
You can set whether the game log files should have dates appended to them and whether the server should automatically send the log files to Keen Software House upon crash.
3. Buttons
– Add a new instance – This allows you to create a new instance of the dedicated server.
– Remove instance – Removes an instance of the dedicated server
– Continue to server configuration – Starts server instance configuration utility for the selected instances
– Exit – Closes the configuration utility
Click on "Continue to server configuration."
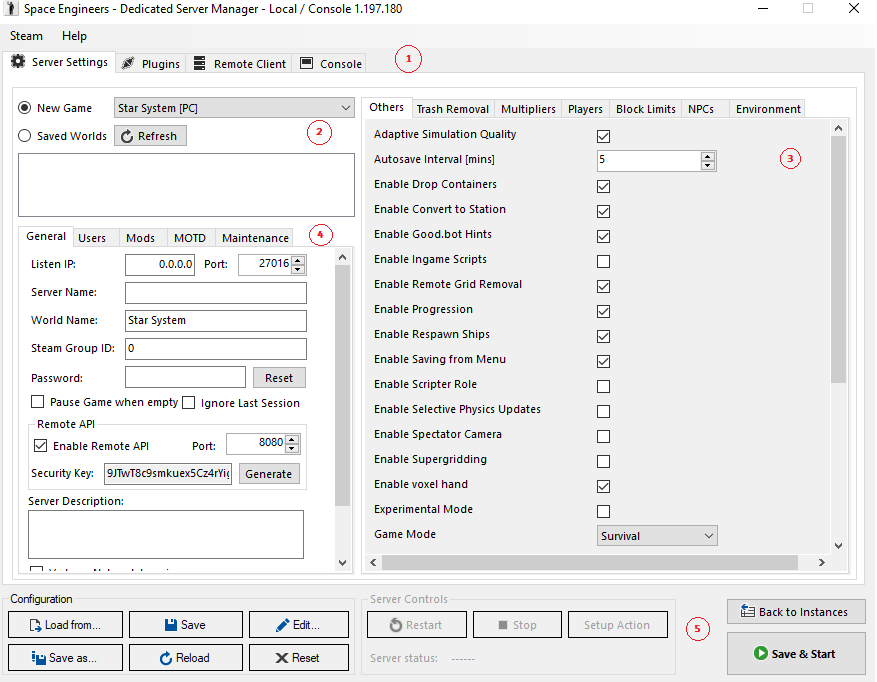
Features
There are 4 main features available
Server Settings
Plugins – Manage Server plugins
Remote Client
Console
New game / Saved worlds option :Create a new world generated from a scenario or load a previously saved game
Game settings
Scenario – Can only be chosen for the "New game" option.
4. Server settings
General
Listen IP – Address of network interface that the server will listen on. This can be set to "0.0.0.0" (which is the default value) to listen on all interfaces.
Port – port that the server will listen on
Server name – Name that will appear in the server list
World name – Name of the world, which shows up in the server list
Steam Group ID – If you set a value, the dedicated server will only be visible for the given Steam group
Password – Password for the server, if you need a protected private server
Remote API – Remote API for controlling server with VRage Remote Client
Server Description – Describes your server
Users
You can select Admins, Banned, and Reserved slots users on this tab. You can use your friends' list or from the history of the world.
5. Configuration and Server controls
Save config – Saves the configuration for the current server instance
Edit config – Opens the current instance's configuration file in a text editor for manual editing
Save & start – Saves the current configuration and starts the server
Restart – Restarts the server
Stop – Stops the server
Back to instances – Returns to the screen with the list of server instances.
Exit – Closes the configuration utility (but not the dedicated server, if it is running as a service)
Setup Actions – this feature can Stop/Restart the server with delay and chat messages on the server.
Click on "Save & Start" button to save your settings and start the server.
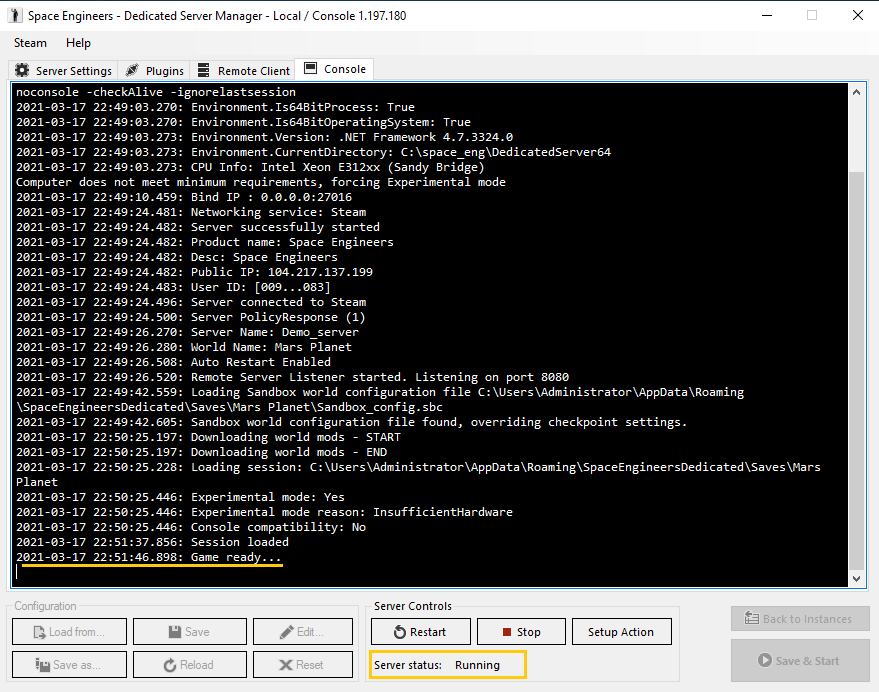
Congratulations!! You have successfully installed and launched Space Engineers on your dedicated server. You can now invite your friends or other players online by promoting your server name or simply sharing your Public IP address.
We hope you have found this guide helpful and could successfully deploy Space Engineers on your Windows server. Please click on the up-vote button to show your appreciation.