•  Home
  •  Dashboard
  •  Company
    • About Us
    • Blog
    • Careers
    • Contact Us
    • Data Centers
    • Looking Glass
    • Network
    • Reseller
  •  Hosting Services
    • Infrastructure
      • iColocation
    • Compute
      • cMetal
      • cVirtual
    • Storage
      • sObject
      • sBlock
    • Networking
      • nCDN
      • nIP Transit
      • nWavelength
    • Protection
      • pBackup
      • pDDoS
  •  Solutions
    • Ecommerce
    • Finance
    • Gaming
    • Hosting
    • Management
    • Security
    • System Integrator
  •  Support
    • Community
    • Knowledge Base
    • Open A Ticket
  •  USA & Canada: 800-933-1517
  •  International: 626-549-2801
  •  Email: sales@psychz.net
  • Services
    • new-colocation-header-img
      Infrastructure
      • iColocation
    • new-compute-header-img
      Compute
      • cMetal
      • cVirtual
    • new-storage-header-img
      Storage
      • sObject
      • sBlock
    • new-networking-header-img
      Networking
      • nCDN
      • nIP Transit
      • nWavelength
    • new-protection-header-img
      Protection
      • pBackup
      • pDDoS
  • Solutions
    • Ecommerce
    • Security
    • Gaming
    • Hosting
    • Management
    • Finance
    • System Integrator
  • Dashboard

Guide to establish a GRE Tunnel and BGP peering session on MikroTik RouterOS

  • Home
  • Client
  • Knowledgebase
  • Network
  • Guide to establish a GRE Tunnel and BGP peering session on MikroTik RouterOS

Table Of Content

Related Articles

  • Setup VPN on CentOS 8
  • Data Center Redundancy: N+1
  • What is the difference between Latency, Bandwidth and Throughput?
  • How To Point A Domain Name To An IP Address
  • How to do a speed test using Psychz looking glass?
  • Quagga Routing - Install, Configure and setup BGP
  • Common Types of Network Attacks
  • Community Strings For Psychz Networks
  • IPv4 - Subnetting made easy
  • Centos add virtual IP(s)
  • Views: (3992)
  • Votes: (0)
Was this article helpful?
VOTE

Guide to establish a GRE Tunnel and BGP peering session on MikroTik RouterOS

Publisher: Psychz Networks,  March 07,2017

Before following these examples below, ensure that the prefix(s) that are going to be used for the peering is not the same prefix that will be announced over the GRE BGP. The GRE public IP should not be in the same range as the prefix you intend to announced.

  • Creating GRE Tunnel
  • IP Address Assignment
  • BGP Local ASN Configuration
  • Adding Network to Broadcast
  • Creating Peer Session
  • Inbound and Outbound Filters

Pyschz.net networks will provide you with the needed information to connect to your GRE account.

In the example we’ll configure the connection with the following parameters:

Psychz GRE end-point(public IP that belongs to psychz.net) - 1.1.1.1

Local GRE end-point(Your public IP being used for the GRE) - 10.10.10.100

Local ASN(your ASN) - 65530

Psychz ASN - 40676

Internal Tunnel IP address (This would be the /30 psychz.net assigned for the GRE) - 192.168.155.0/24

( NOTE - Do not use this /24 as your local gre peering information, this is an example to be used as reference only! )

Psychz Peering IP(psychz.net GRE Private address) - 192.168.155.2

Local Peering IP(your GRE private address) - 192.168.155.1

Network to be broadcasted(The prefix(s) you are going to announced) - 100.100.100.0/24

( NOTE - The IP information on this article varies per provider. This is a reference only, so do not start adding the exact IP address to your router )

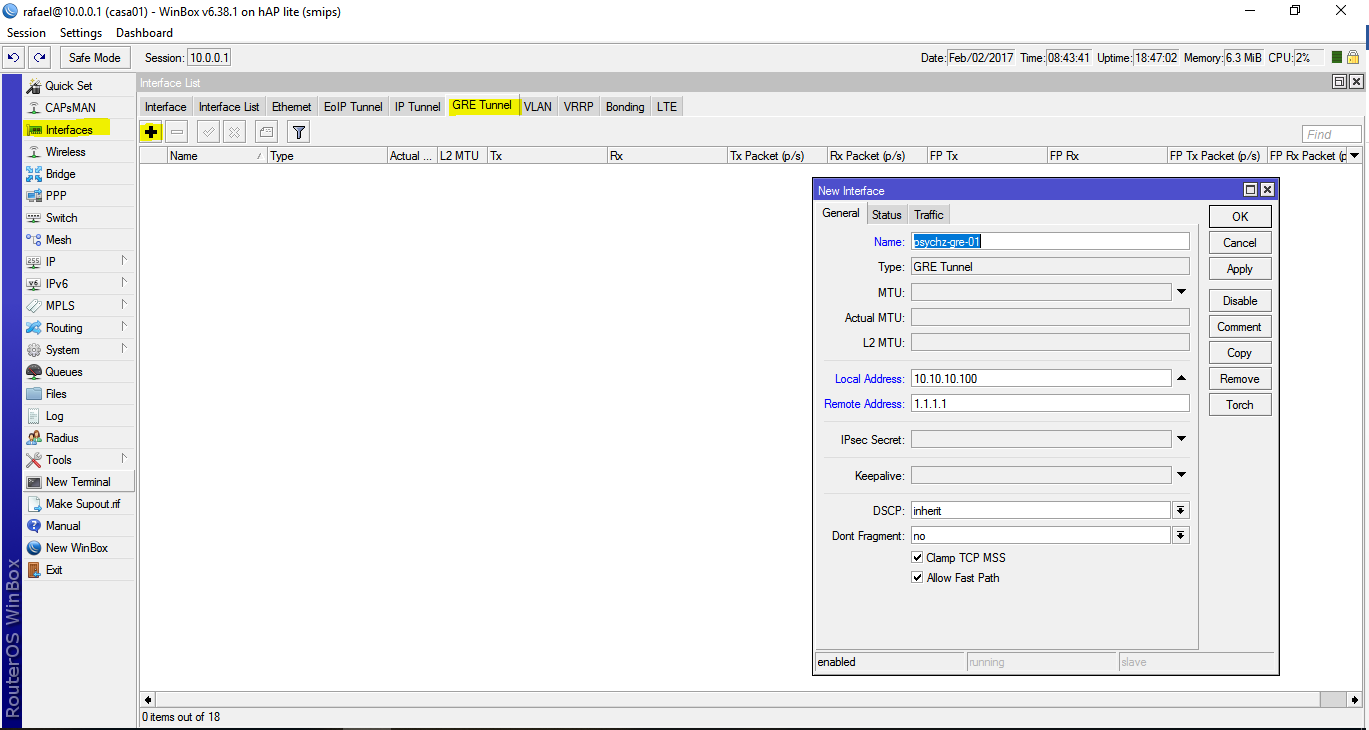
1. Creation of the GRE tunnel

1.1 Console

We use the following command:

/interface gre add name=”psychz-gre-01” local-address=10.10.10.100 remote-address=1.1.1.1

1.2 WinBox

Interface -> Gre Tunnel -> Add (Blue cross button) -> Add the parameters

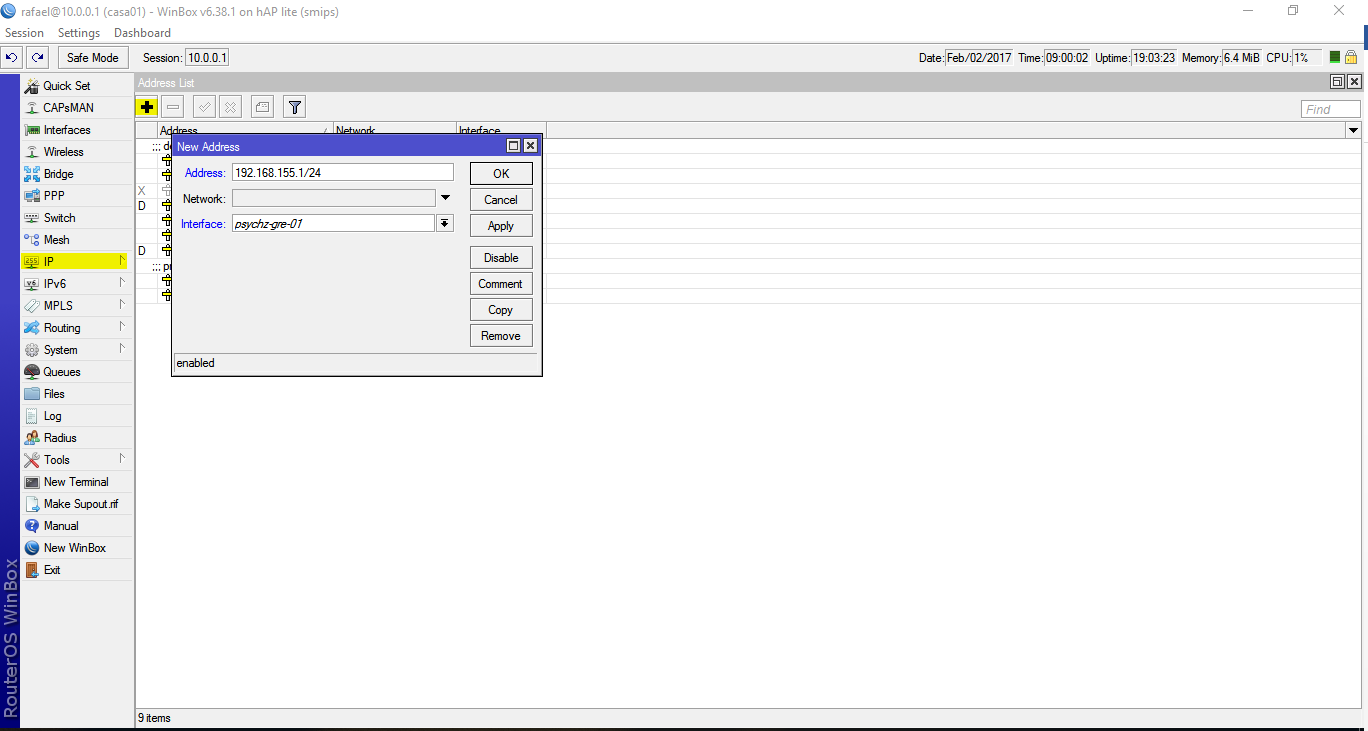
2. GRE tunnel IP address assignment

2.1. – Console

We use the following command:

/ip address add interface=”psychz-gre-01” address=192.168.155.1/24

( NOTE - The 192.168.155.1/24 is your GRE internal ip; what psychz.net gives will be similar to this, 10.20.20.2/30, psychz.net being 10.20.20.1/30 )

2.2. - WinBox

IP -> Addresses -> Add -> Add the parameters

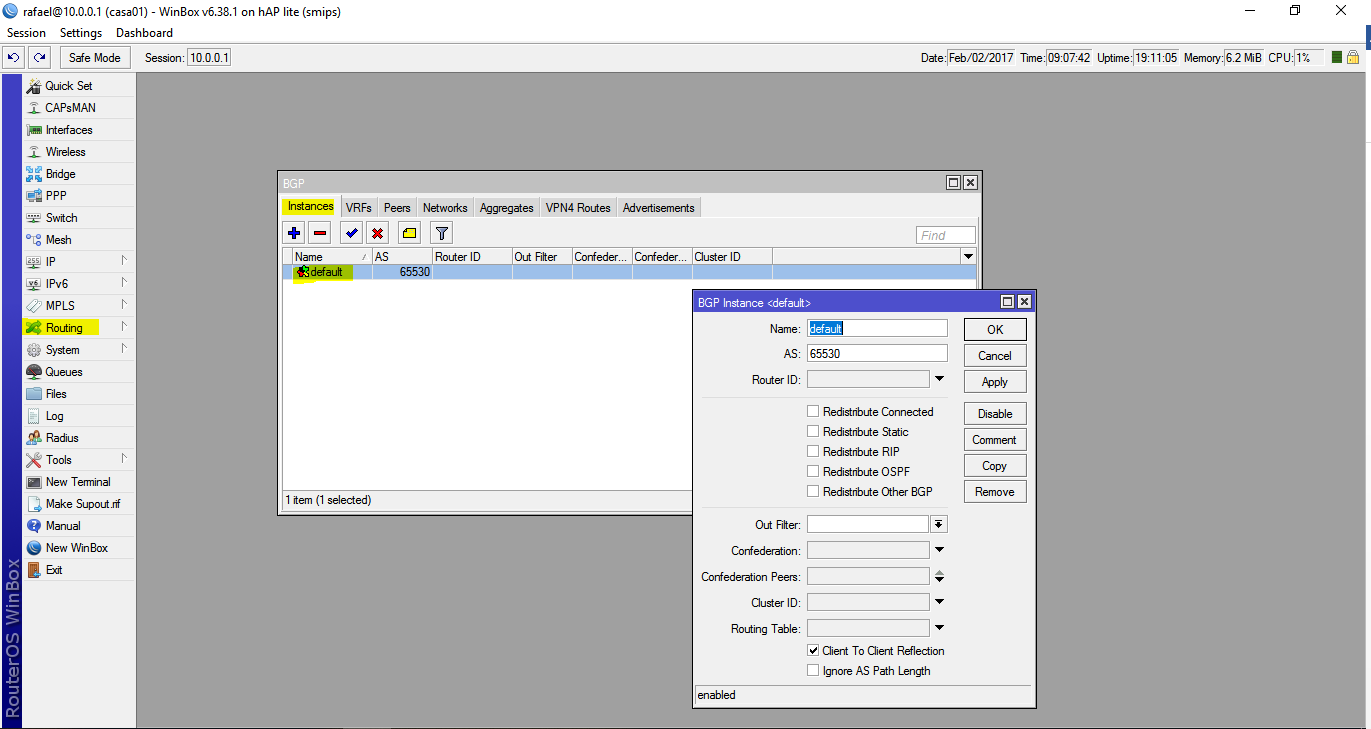
3. BGP local ASN configuration

RouterOS can have many parallel instances of BGP, for normal use we just need to edit the “default” instance

3.1. – Console

We use the following command:

/routing bgp instance set default as=65530

3.2. – WinBox

Routing -> BGP -> Instances -> Double Click on “default” -> Add the parameters

4. Adding networks to be broadcasted via BGP

Regular BGP rules for broadcasting apply here, unless the “synchronize” mark is tickled (append synchronize=no if done via console to the network command), there must be a valid and active route in the routing-table for the prefix to be broadcasted.

4.1 Console

We use the following command:

/routing bgp network add network=100.100.100.0/24

4.2. – WinBox

Routing -> BGP -> Networks -> Add -> Add the parameters

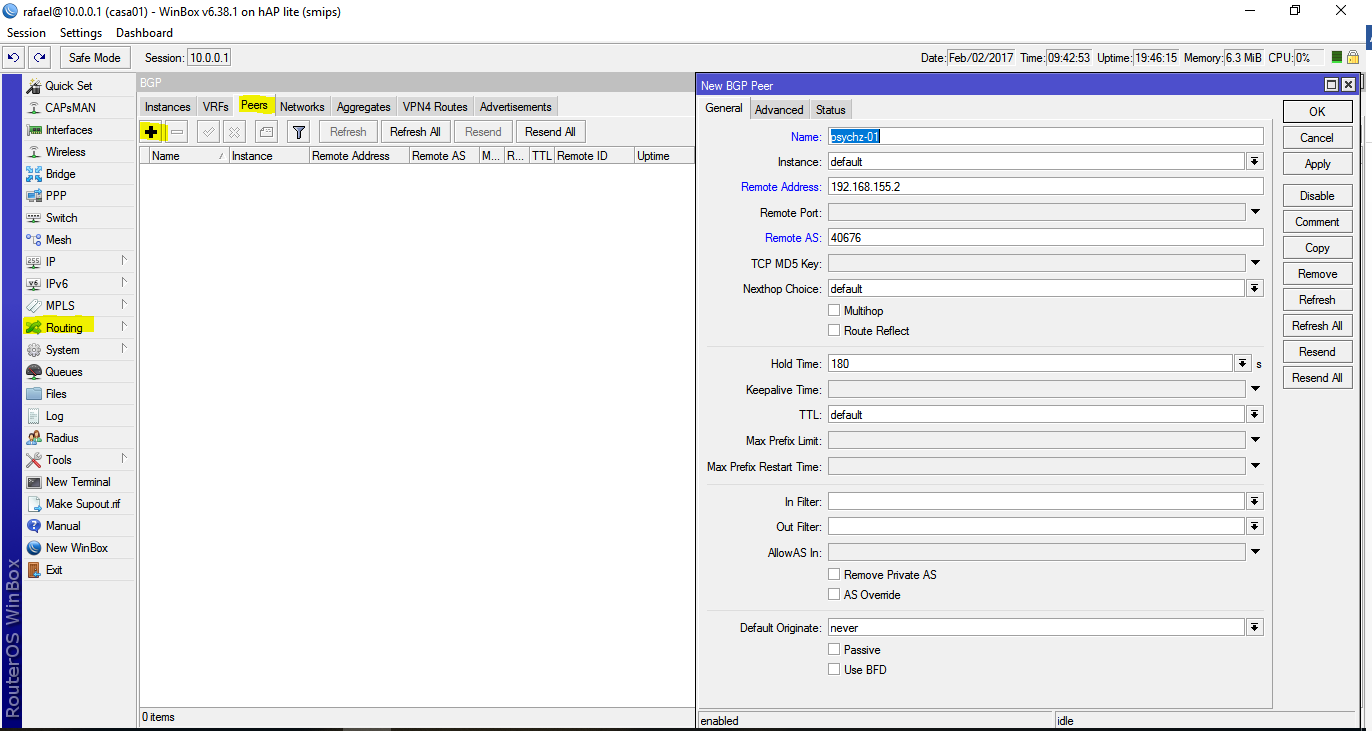
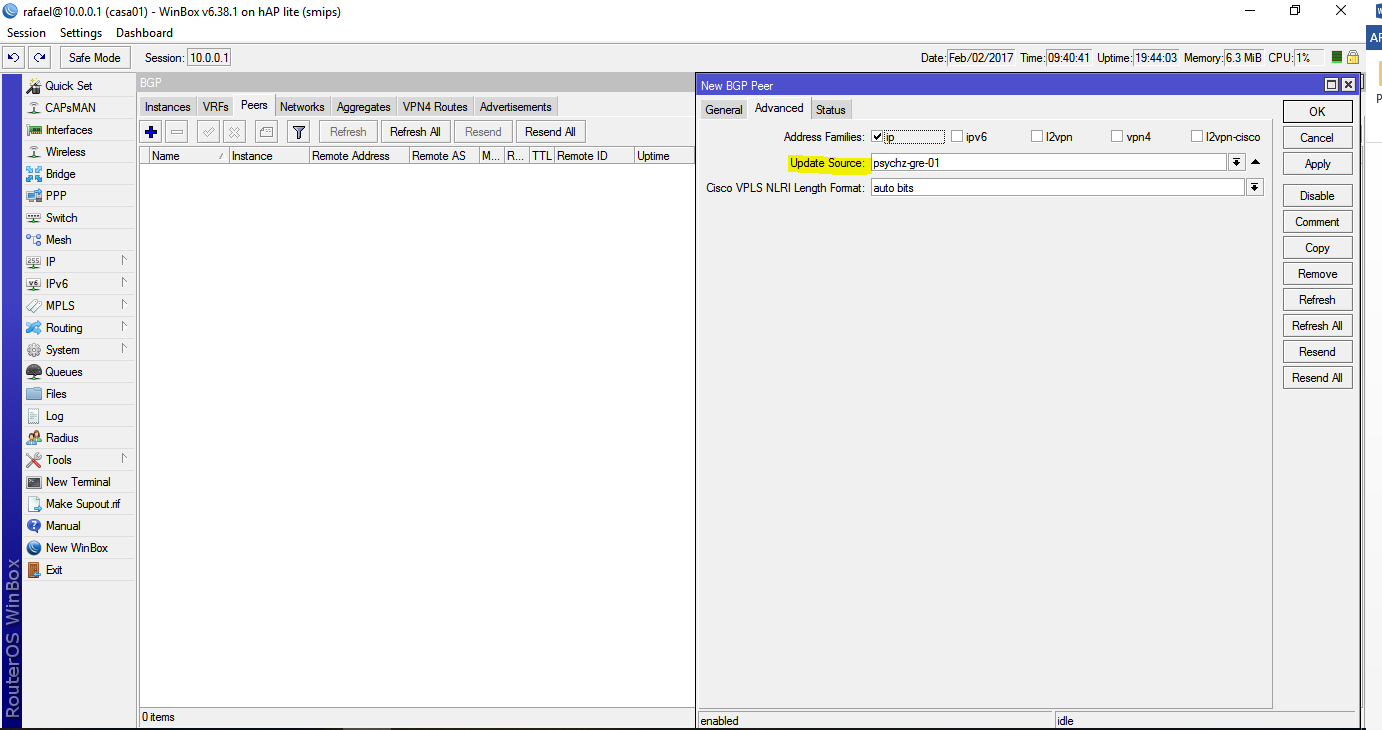
5. Creating a peering session

For this we’ll define the local name of the peer (this is just a reference, can be anything), remote-as, remote-address and the update-source (we’ll set it to be the IP of the GRE interface we just created)

5.1. Console

We use the following command:

/routing bgp peer add name=”psychz-01” remote-address=192.168.155.2 remote-as=40676 update-source=”psychz-gre-01”

5.2. WinBox

Routing -> BGP -> Peers -> Add -> General TAB -> Add the Parameters (Name, Remote-IP and Remote-AS)

(NOTE: The "instance: default", may not always be default, so ensure to used whatever name used in step "3.2. – WinBox", it has to match. Otherwise the BGP session will not establish.)

Routing -> BGP -> Peers -> Add -> Advanced TAB -> Add the Parameters (Update-Source)

6. Adding Inbound and Outbound Filters (optional, but recommended)

Filters need to be defined at “routing -> filters” and tied to peering via the In Filter and Out Filter options when creating or editing the peer. However this requires to know first the RouterOS sintax for these, more information can be found here: http://wiki.mikrotik.com/wiki/Manual:Routing/Routing_filters

Related Articles

  • Setup VPN on CentOS 8
  • Data Center Redundancy: N+1
  • What is the difference between Latency, Bandwidth and Throughput?
  • How To Point A Domain Name To An IP Address
  • How to do a speed test using Psychz looking glass?
  • Quagga Routing - Install, Configure and setup BGP
  • Common Types of Network Attacks
  • Community Strings For Psychz Networks
  • IPv4 - Subnetting made easy
  • Centos add virtual IP(s)
  • Views: (3992)
  • Votes: (0)
Was this article helpful?
VOTE
Copyright © 2025 Psychz Networks,
A Profuse Solutions Inc Company
Hosting Services
Infrastructure
  • iColocation
Compute
  • cMetal
  • cVirtual
Storage
  • sObject
  • sBlock
Networking
  • nCDN
  • nIP Transit
  • nWavelength
Protection
  • pBackup
  • pDDoS
Company
  • About Us
  • Blog
  • Careers
  • Contact Us
  • Data Centers
  • Looking Glass
  • Network
  • Reseller
Policies
  • Acceptable Usage Policy
  • Privacy Policy
  • Service Level Agreement
  • Terms and Conditions
Support
  • Community
  • Knowledge Base
  • Open A Ticket
Get In Touch
  • Psychz Networks,
    A Profuse Solutions Company
    611 Wilshire Blvd #300
    Los Angeles,California 90017
    USA
  • US/Canada: 800-933-1517
  • International: 626-549-2801