


A VPN (Virtual Private Network) is a simple application that allows you to protect your online privacy and make it difficult for hackers by masking your IP addresses and keeping your identity anonymous by hiding your location. VPN can also be used for many other purposes, such as maintaining internet freedom by accessing data from outside your region, improving data security, and keeping your browsing history a secret.
The following article will learn how to install and configure OpenVPN on CentOS 8 (Linux system). OpenVPN is an open-source and free virtual private network (VPN) software. This tutorial provides step-by-step instructions for configuring an OpenVPN server on CentOS 8 Linux server.
Step 1: Update your system
# sudo yum updateNext, install tar on CentOS and also install wget on CentOS 8
# sudo yum install tar wget
Step 2: Note your server’s IPv4 or IPv6 address
Use the IP command as follows:
# ip a show eth0

We can try the following dig command/host command to find out your public IP address from the Linux command line:
[root@centos-8 ~]# dig +short myip.opendns.com @resolver1.opendns.com
Output
Please note down 104.217.3.7 IP address. You need to replace this one with your actual IPv4.
NOTE:
Most cloud servers have two types of IP address:
Public static IP address directly assigned to your box and routed from the Internet. For example, Linode, Digital Ocean, and others give you direct public IPv4/IPv6 addresses. Private static IP address directly attached to your server, and your server is behind NAT with a public IP address. The script will automatically detect your networking setup. All you have to do is provide a correct IPv4 or IPv6 address when asked for it. Hence, we used the above command to determine our IP address in advance.
Step 3: Download and run centos-8-vpn.sh script
Use wget command to download the file from the repository
# wget https://raw.githubusercontent.com/Angristan/openvpn-install/master/openvpn-install.sh -O centos-8-vpn.sh
Make sure you set up permissions using the chmod command:
# chmod +x centos-8-VPN.sh
Installing OpenVPN server on CentOS 8 Linux using the centos-8-vpn.sh. Now all you have to do is run shell script on Linux:
# sudo ./centos-8-vpn.sh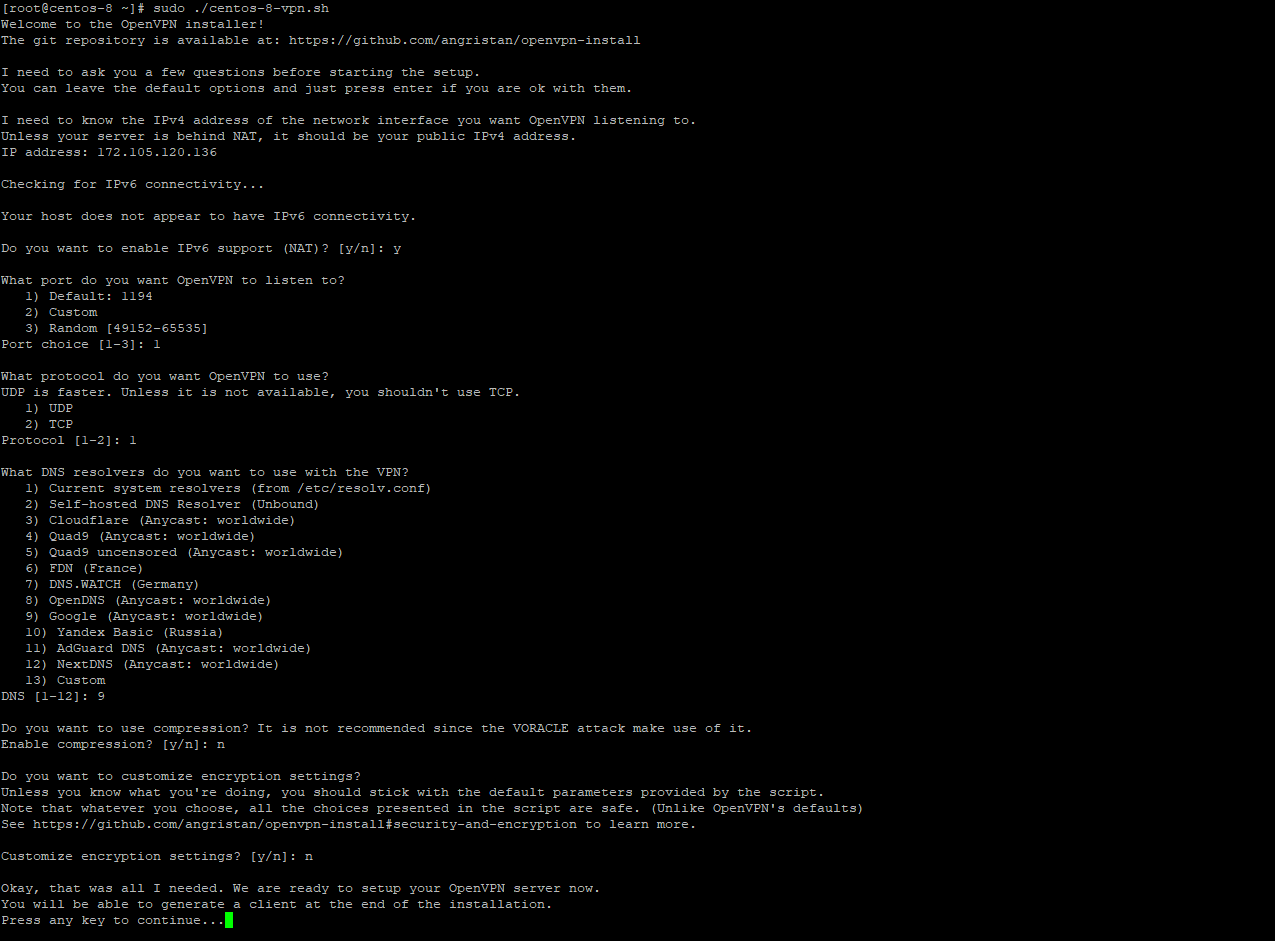
Step 4: Configuring the VPN
How do I start/stop/restart the OpenVPN server on CentOS 8 ?
Stop the server
# sudo systemctl stop openvpn-server@server.serviceStart the server
# sudo systemctl start openvpn-server@server.serviceRestart the server
# sudo systemctl restart openvpn-server@server.serviceGet the server status
# sudo systemctl status openvpn-server@server.service
Output:
● openvpn-server@server.service - OpenVPN service for server
Loaded: loaded (/etc/systemd/system/openvpn-server@.service; enabled; vendor preset: disabled)
Active: active (running) since Thu 2021-02-11 02:34:28 PST; 5 days ago
Docs: man:openvpn(8)
https://community.openvpn.net/openvpn/wiki/Openvpn24ManPage
https://community.openvpn.net/openvpn/wiki/HOWTO
Main PID: 56968 (openvpn)
Status: "Initialization Sequence Completed"
Tasks: 1 (limit: 23722)
Memory: 1.4M
CGroup: /system.slice/system-openvpn\x2dserver.slice/openvpn-server@server.service
└─56968 /usr/sbin/openvpn --status /run/openvpn-server/status-server.log --status-version 2 --suppress-timestamps --cipher AES-256-GCM --ncp-ciphers AES-256-GCM:AES-128-GCM:AES-256-CBC:AES-128->
Feb 11 02:34:28 centos-8 openvpn[56968]: Could not determine IPv4/IPv6 protocol. Using AF_INET
Feb 11 02:34:28 centos-8 openvpn[56968]: Socket Buffers: R=[212992->212992] S=[212992->212992]
Feb 11 02:34:28 centos-8 openvpn[56968]: UDPv4 link local (bound): [AF_INET][undef]:1194
Feb 11 02:34:28 centos-8 openvpn[56968]: UDPv4 link remote: [AF_UNSPEC]
Feb 11 02:34:28 centos-8 openvpn[56968]: GID set to nobody
Feb 11 02:34:28 centos-8 openvpn[56968]: UID set to nobody
Feb 11 02:34:28 centos-8 openvpn[56968]: MULTI: multi_init called, r=256 v=256
Feb 11 02:34:28 centos-8 openvpn[56968]: IFCONFIG POOL: base=10.8.0.2 size=252, ipv6=0
Feb 11 02:34:28 centos-8 openvpn[56968]: IFCONFIG POOL LIST
Feb 11 02:34:28 centos-8 openvpn[56968]: Initialization Sequence Completed
[root@centos-8 ~]#
Conclusion
If you were successfully able to execute all the steps given above, you have successfully installed the OpenVPN server on your server with CentOS 8. The data transmitted over VPN is encrypted and is decrypted at the user's end. For more information on OpenVPN configuration options, please refer to their documentation here on https://openvpn.net/access-server-manual/tools-documentation-and-support/