•  Home
  •  Dashboard
  •  Company
    • About Us
    • Blog
    • Careers
    • Contact Us
    • Data Centers
    • Looking Glass
    • Network
    • Reseller
  •  Hosting Services
    • Backup
    • Content Delivery Network
    • Colocation Hosting
    • Dedicated Hosting
    • DDoS Mitigation
    • IP Transit
    • Private Cloud
    • Wavelength
  •  Solutions
    • Ecommerce
    • Finance
    • Gaming
    • Hosting
    • Management
    • Security
    • System Integrator
  •  Support
    • Community
    • Knowledge Base
    • Open A Ticket
  •  USA & Canada: 800-933-1517
  •  International: 626-549-2801
  •  Email: sales@psychz.net
  • Services
    • Dedicated Servers
    • Colocation
    • Private Cloud
    • DDos Protection
    • IP Transit
    • CDN
    • Backup
  • Solutions
    • Ecommerce
    • Security
    • Gaming
    • Hosting
    • Management
    • Finance
    • System Integrator
  • Dashboard

Quagga Routing - Install, Configure and setup BGP

Trusted By
25,000+ Customers (Since 2001)
  • Home
  • Client
  • Knowledgebase
  • Network
  • Quagga Routing - Install, Configure and setup BGP

Table Of Content

Related Articles

  • Setup VPN on CentOS 8
  • Data Center Redundancy: N+1
  • What is the difference between Latency, Bandwidth and Throughput?
  • How To Point A Domain Name To An IP Address
  • What is The 95th Percentile Bandwidth Metering?
  • How to do a speed test using Psychz looking glass?
  • Guide to establish a GRE Tunnel and BGP peering session on MikroTik RouterOS
  • Common Types of Network Attacks
  • Community Strings For Psychz Networks
  • IPv4 - Subnetting made easy
  • Centos add virtual IP(s)
  • Views: (40397)
  • Votes: (20)
Was this article helpful?
VOTE

Quagga Routing - Install, Configure and setup BGP

Publisher: Psychz Networks,  November 21,2017


Quagga routing suite is a fine open-source routing software. Quagga is a fork of GNU Zebra which allows the functionality of routing. Just like you can access router and give commands, you can do the same with this application.
Its architecture is very interesting since it is installed on Linux and it acts as an abstraction layer on the Kernel of Linux server and rest of the architecture consists of sockets on which all the communication occurs.
You can access all the protocols through CLI just like you are accessing some third layer router and you will not feel any difference in applying commands.

  • Installing
  • Configuration
  • Zebra Coniguration
  • Vytish CLI
  • BGP Peering
  • Configure Prefix


Quagga Installation

To install Quagga on your system, please use the following commands.

1. For CentOS operating system:  yum install quagga

2. CentOS 7 operating system:  yum install quagga setsebool zebra_write_config 1

3. Debian/Ubuntu family: apt-get install quagga


Quagga Configuration

The Quagga suite contains several different pieces of software that work together to accomplish successful routing. For BGP routing, we are focusing primarily on two daemons, namely
 
Zebra- A core daemon that focuses on kernel interfaces and static routing.
BGPd- A BGP daemon


Zebra Configuration

Once installed, we need to configure everything. Let’s start with Zebra and configure logging with it.

cp /usr/share/doc/quagga-XXXXX/zebra.conf.sample /etc/quagga/zebra.conf

(Note: "quagga-XXXXX" in the above line refers to the version of Quagga that you have installed. For instance, we have installed version "quagga-0.99.22.4" in this case.)


CentOS
service zebra start
chkconfig zebra on


CentOS 7
systemctl start zebra
systemctl enable zebra


Vtysh CLI

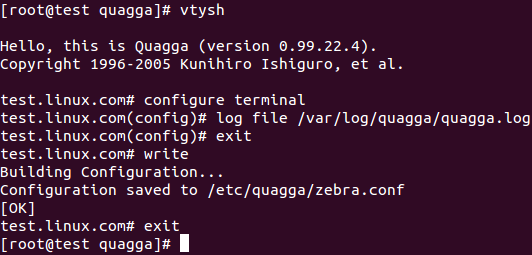
Quagga offers a dedicated CLI shell called vtysh. This CLI helps the user to interact with the software with user-friendly commands. 
 
To launch vtysh, we use the following command.

vtysh


Specify the log file for Zebra via the following command.

configure terminal
log file /var/log/quagga/quagga.log
exit


Now we save the configuration before exiting.

write


BGP peering Configuration

For BGP peering, we first copy the sample configuration file from "/usr/share/doc" to "/etc". Then, we will start and enable the bgp service. After all this is done, we configure the BGP session.


1) Let’s prepare the BGP daemon (BGPd)’s configuration file.

cp /usr/share/doc/quagga-XXXXXXX/bgpd.conf.sample /etc/quagga/bgpd.conf


2) Start and enable the bgpd daemon

CentOS 6
service bgpd start
chkconfig bgpd on
 
CentOS 7
systemctl start bgpd
systemctl enable bgpd


Now we enter the Quagga shell with the help of the following command.

vtysh


Now let’s make our own BGP session.

configure terminal
router bgp <asn>
no auto-summary
no synchronization
neighbor <neighbor IP> remote-as <remote ASN>
neighbor <neighbor IP> description “Remote ASN”
exit
exit
write


Now please confirm that BGP is setup properly with the following command.

show ip bgp summary


Configure prefix advertisements

In this example, we will advertise prefix 8.8.8.0/24. You can choose any prefix as per your network preferences.

configure terminal
router 
bgp <asn>
network 8.8.8.8/24
exit
write

Hosting Services
  • Dedicated Hosting
  • Colocation Hosting
  • Backup
  • IP Transit
  • DDoS Mitigation
Support
  • Portal Login
  • Knowledgebase
  • Community
Company
  • About Us
  • Contact Us
  • Network
  • Data Centers
  • Looking Glass
  • Affiliates
  • Reseller
  • Blog
Policies
  • Privacy Policy
  • Acceptable Usage Policy
  • Terms and Conditions
  • Service Level Agreement
Company
  • Psychz Networks,
    A Profuse Solutions Company
    611 Wilshire Blvd #300
    Los Angeles,California 90017
    USA
  • US/Canada: 800-933-1517
  • International: 626-549-2801
Subscribe to Our Mailing List
* indicates required
Copyright © 2022 Psychz Networks, A Profuse Solutions Inc Company