
Psychz - Sharad
Votes: 0Posted On: Mar 20, 2017 13:13:06
Securing MongoDB on CentOS 7
About
Built on an open-source technology, MongoDB has rapidly grown and has become a popular database largely used for web applications and is perfect for Node.JS applications. To match today’s evolving data structures in web applications MongoDB’s schemaless nature delivers the right results. It uses documents with schemas instead of tables as in SQL. MongoDB offers advantages like auto shading, rich queries, replication etc. and is used extensively in areas like Big Data, Content Management and Delivery. In the following tutorial, we will learn how to ensure security over this database and develop a stronger environment.
Security and Authorization
Security is a primary concern when it comes to dealing with data and securing MongoDB server from unknown sources is one of the important tasks of the server administrator. The default security configuration allows any anonymous user to have unprecedented access to the database which can lead to stealing of critical information from the servers. This makes it highly important to secure the server from any unauthorized access. It is also important to introduce access control to the MongoDB server so that only authorized users with passwords can access the server.
Prerequisites
Operating System: CentOS 7
MongoDB server
Part 1: Securing the access over the Network
The following steps are to be followed after the MongoDB is installed on the server. MongoDB is available in a wide range of versions. The version that we have installed here is 2.6.12.
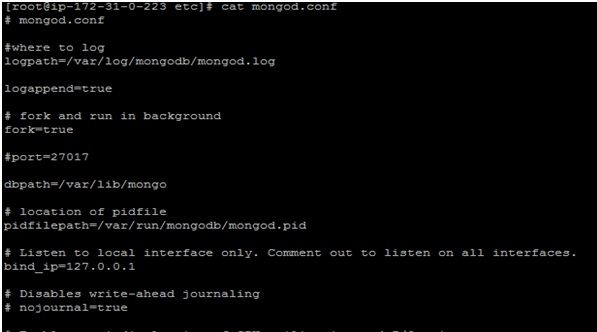
Note: The MongoDB stores its configuration file under /etc/mongodb.conf. Using a VI editor you can open the file and see that the default port is 27017.
Step 1: Limiting Network Exposure
MongoDB access can be contained within a limited group of users by limiting the network access and filtering its connection to the outside network.
If the web and the MongoDB server are configured on the same system, the binded IP in the MongoDB configuration file should be set to “127.0.0.1” which is the host IP. However, if it is not to set to “127.0.0.1” you will have to change it so it disconnects itself from connecting to the outside world. In this case, it is already set to the desired IP.
What it does?
It hereby suspends communication of MongoDB from the internet. The bind_ip directive Ensure that MongoDB runs in a trusted network environment and limit the interfaces on which MongoDB instances listen for incoming connections.

Important: Save and close the mongodb.conf file. Restart the MongoDB server
sudo systemctl restart mongod
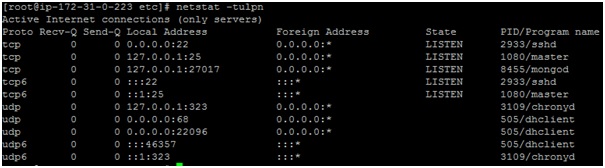
Step 2: Verify the open MongoDB port by using the netstat command
netstat -tulpn
Part 2.A: Access Control Setup
As MongoDB is an open source, initially, after installation MongoDB can be accessed by any anonymous user which is not secure. Hence, we need to setup access control to secure the data stored in it. This can be done by some simple steps:
Step 1: Enter the MongoDB server
Type following command to connect to the database
mongo

Step 2: Switch to admin database and creating a user in the admin database
Note: To create users under database you need to switch to admin database using following command
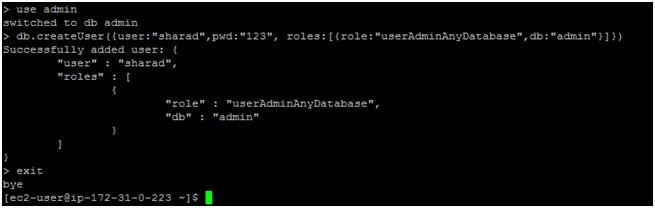
use admin
Next, we will create a user and assign a password to it with the userAdminAnyDatabase role:
Use the following command with proper syntaxes to create the user with specified role
db.createUser({user:"sharad",pwd:"hello123", roles:[{role:"userAdminAnyDatabase",db:"admin"}]})
This will create a user named “sharad” with password “hello123”.
Output:
Important: Disconnect the mongo shell
exit
Step 3: Enter the mongodb.conf configuration file
Now we need to enter this file again and change the authorization to “true” to bring it in effect. In this case, it is already true so we need not make any change. However, if it is ‘false’ then you need to append it to ‘true’
Save and close the file
Step 4: Restart the MongoDB instance
sudo systemctl restart mongod
Part 2.B: Database Security
Yet another level of authentication is securing the individual databases by adding a user with valid password. This is done to secure the databases as every user is not authorized to access all the databases. The following steps demonstrate how to secure a database:
Step1: Access the MongoDB and create a database
Type following command to connect to the database
mongo

Now, we create database “mercury” by using the “use” command:
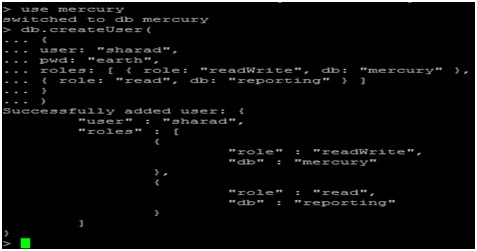
use mercury
Step 2: Create a user
Create a user named ‘sharad’ with a password named ‘earth’ for mercury db the following command:
db.createUser(
{
user: "sharad",
pwd: "earth",
roles: [ { role: "readWrite", db: "mercury" },
{ role: "read", db: "reporting" } ]
}
)
Step 3: Connecting to “mercury” db
We need to allow authorization to admin user who can execute commands or user “sharad” can do read/write operation on mercury db.
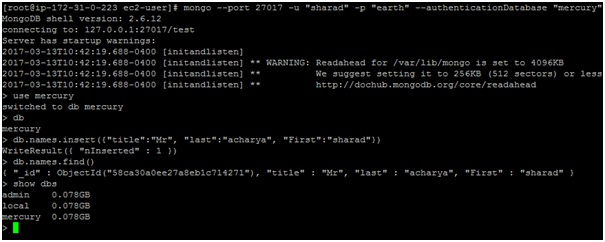
mongo --port 27017 -u "sharad" -p "earth" --authenticationDatabase "mercury"
You can verify it as follows by inserting records in the following manner
Step3.1
Following command will open the database specified after “use” (in this case we are switching to “mercury” database which we created in step above)
use mercury
Step3.2
In the following step we create an object “names” and insert the fields “Title”; “last” and “First”
db.names.insert({"title":"Mr", "last":"acharya", "First":"sharad"})
Step3.3
The following command displays entries under the object named “names”
db.names.find()
Summary
In this tutorial, we have used 3 precautionary measures to secure the database from unwanted unauthorized access using steps given above. It is important to perform these steps right after the database is installed and before it is brought in use.


