•  Home
  •  Dashboard
  •  Company
    • About Us
    • Blog
    • Careers
    • Contact Us
    • Data Centers
    • Looking Glass
    • Network
    • Reseller
  •  Hosting Services
    • Backup
    • Content Delivery Network
    • Colocation Hosting
    • Dedicated Hosting
    • DDoS Mitigation
    • IP Transit
    • Private Cloud
    • Wavelength
  •  Solutions
    • Ecommerce
    • Finance
    • Gaming
    • Hosting
    • Management
    • Security
    • System Integrator
  •  Support
    • Community
    • Knowledge Base
    • Open A Ticket
  •  USA & Canada: 800-933-1517
  •  International: 626-549-2801
  •  Email: sales@psychz.net
  • Services
    • Dedicated Servers
    • Colocation
    • Private Cloud
    • DDos Protection
    • IP Transit
    • CDN
    • Backup
  • Solutions
    • Ecommerce
    • Security
    • Gaming
    • Hosting
    • Management
    • Finance
    • System Integrator
  • Dashboard

How to assign IP address in Centos?

  • Home
  • Client
  • Qa Forum
  • How to assign IP address in Centos?

Posted By: Cameron | 1 Replies | Last Reply On: Sep 13, 2019 10:35:04

I got the /29 IP range from you guys and after a clean install, I need to assign the /29 IP address.  How can i go about configuring the IP address in centos? 

Psychz - Swarup

Votes: 1Posted On: Sep 13, 2019 10:35:04
 

This article aims at providing insight into configuring IP ranges on CentOS 7 operating system. CentOS system offers a method to bind a range of IPs in a highly efficient way.

Now the network configuration file in CentOS 7 is stored in “/etc/sysconfig/network-scripts”. There are multiple network files under “network-scripts” directory depending on the number of interfaces configured. The following steps will show you how to bind a range of IPs.

Prerequisites

  • Operating system: CentOS 7
  • Minimum of one Active network interface
  • Root permission

Step 1. Check the network interfaces by using the following command:

  #  ip a

Output:

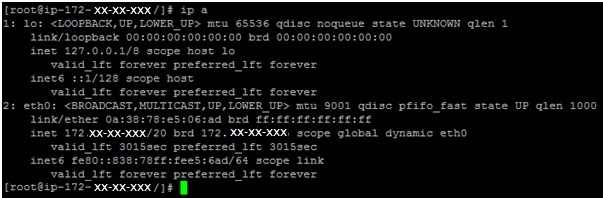
Note: It can be observed that in this case there is only one network interface eth0 (the Ethernet port) and a loopback device. It is following the DHCP protocol which has to be changed to static. Moreover, the IP is of the private IP range with subnet “/20”. This IP has to be changed to a static IP range.

Step 2. Locate and open the network configuration file “ifcfg-eth0” stored in /etc/sysconfig/network-scripts

Output: Under the DHCP protocol the file looks like this:

Note: This file can be edited using a VI editor to configure static IP in the server. The different parameters to be added are:

BOOTPROTO – It is the protocol to be implemented during Boot time. It has to be changed to “static” for static IP configuration.
IPADDR – Edit the IP address in the IPADDR field
NETMASK – Add the IP range that has to be configured.
NETWORK – Add the network IP of the IP range.
GATEWAY – Add the Gateway IP

After the Network parameters have been configured, the network configuration file should look something like this:

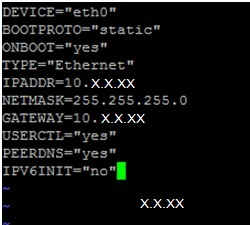
Note: Save and close the file.

Step 3: Restart the network services by the command

# Systemctl restart network


Summary

With the help of this document, we were able to switch from DHCP to static IP and configure the IP address, netmask, and gateway IP by altering the network configuration file. The network scripts can only be altered by the root user. It is highly recommended to be very careful while editing the network-scripts. In-Depth knowledge of the network configuration can help to manipulate the network according to the requirement.


Was this reply helpful?

Related topics

  • CentOS 7: "CALL IT RED HAT 7 LITE"
  • Setup VPN on CentOS 8
  • Yum Update Not Working on Centos 7
  • Upgrade Centos 6 to Centos 7
  • Calculate IP address range from subnet
  • Is Centos 8 the last stable OS release?
  • How to secure Mongodb on Centos 7?
  • How to configure an IP range on Centos 7?
  • What is a subnet in an IP Address?
  • Firewalld commands for CentOS 7 and CentOS 8
  • How to configure IP's On Centos 7?
  • Psychz CDN Products and Features Updates
  • How To Setup Application Load Balancer Using CDN
  • CDN and Load Balancer: Ultimate combination for efficient content delivery
  • Top Hosting Control Panels For Linux
Hosting Services
  • Dedicated Hosting
  • Colocation Hosting
  • Backup
  • IP Transit
  • DDoS Mitigation
Support
  • Portal Login
  • Knowledgebase
  • Community
Company
  • About Us
  • Contact Us
  • Network
  • Data Centers
  • Looking Glass
  • Affiliates
  • Reseller
  • Blog
Policies
  • Privacy Policy
  • Acceptable Usage Policy
  • Terms and Conditions
  • Service Level Agreement
Company
  • Psychz Networks,
    A Profuse Solutions Company
    611 Wilshire Blvd #300
    Los Angeles,California 90017
    USA
  • US/Canada: 800-933-1517
  • International: 626-549-2801
Subscribe to Our Mailing List
* indicates required
Copyright © 2023 Psychz Networks, A Profuse Solutions Inc Company